
Why Your PNG File Gets Too Large After Editing and How to Fix It
Learn why a PNG file gets too large after editing, when to convert it, and how to prepare a smaller image for upload with simple, practical steps that work.
COMPRESS FILES
6/26/20266 min read
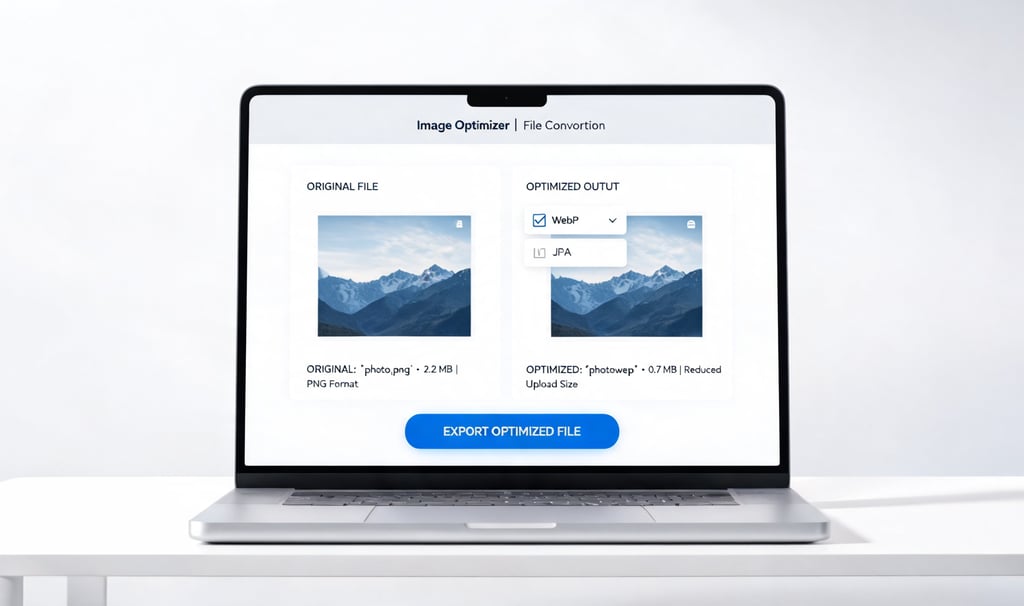
You edited an image, saved it as PNG, and suddenly the file is much larger than expected. Maybe it looked small before, but after adding text, cropping, changing the background, or exporting it again, the upload portal says the file is too large. This is frustrating when you only need to send a screenshot, upload a form image, attach a design preview, or submit a simple graphic.
A PNG file gets too large after editing because PNG is built to preserve sharp details and visual quality. That can be useful, but it can also create a heavier file than you need. The solution is not always to keep saving the image again and again. In many cases, choosing the right format before uploading can make the file easier to send.
This guide explains why PNG files become large, when you should keep PNG, when you should convert to JPG or WebP, and how ImageToSend’s Image Converter can help you prepare a more upload-friendly version.
Why a PNG File Gets Too Large After Editing
PNG is often used for screenshots, graphics, images with text, transparent backgrounds, icons, and design files. It is popular because it can keep edges sharp and preserve transparency. But those benefits can also make the file heavier.
When you edit a PNG, several things can increase the file size:
The image dimensions may stay very large.
Transparent areas may be preserved.
Sharp text and graphic edges may require more data.
The editor may save extra image information.
The image may include many colors or detailed areas.
You may export at a higher quality than needed.
Screenshots may contain lots of small visual details.
For example, a simple phone screenshot may become much heavier after you add arrows, text boxes, or highlights. A product image with a transparent background may also stay large because PNG keeps the transparency information.
PNG Is Not Always the Best Format for Uploads
PNG is useful, but it is not always the best choice for every upload. Many online forms, websites, job portals, and email systems care more about file size and compatibility than perfect pixel preservation.
PNG is usually better for:
Screenshots with text
Simple graphics
Transparent backgrounds
Logos or icons
Images that need sharp edges
Interface captures
JPG is usually better for:
Regular photos
Camera images
Product photos without transparency
Profile pictures
Images where smaller file size matters more than transparency
WebP can be useful for:
Modern web use
Smaller image files
Uploads where the website accepts WebP
Images that need good quality with less weight
ImageToSend’s public guidance supports using Image Converter for JPG, PNG, WebP, format compatibility, format conversion, and PNG files that become too large.
When You Should Keep the PNG Format
Do not convert every PNG automatically. Sometimes PNG is still the right format.
Keep PNG when the image needs:
A transparent background
Very sharp text
Clean graphic edges
A logo-style appearance
Screenshots where small text must stay readable
Simple shapes with flat colors
For example, if you are uploading a transparent icon, converting it to JPG may add a solid background. If you are sending a screenshot with small text, JPG compression may make the text look less clean.
The goal is not to avoid PNG completely. The goal is to understand when PNG is helping and when it is making the file heavier than necessary.
When You Should Convert a Large PNG
You should consider converting a PNG when the image does not need transparency or perfect graphic edges.
A good time to convert is when:
The PNG is a normal photo.
The file is too large for an upload limit.
The website accepts JPG but rejects large PNG files.
You do not need a transparent background.
The image is mainly a picture, not a screenshot.
The PNG was created after editing a photo.
The image needs to be attached to an email.
For example, if you edited a product photo and saved it as PNG, the file may be larger than needed. If there is no transparency and the image is photographic, converting it to JPG may make it easier to upload.
How to Fix a PNG File That Is Too Large After Editing
Step 1: Check What the Image Is Used For
Before changing the file, ask what the image needs to do.
Is it a photo? A screenshot? A design preview? A document image? A transparent graphic?
This matters because the right format depends on the purpose. A photo usually does not need PNG. A transparent graphic may need PNG. A screenshot may depend on whether readability or size matters more.
Step 2: Check the Upload Requirements
Look at the instructions on the website, email system, or portal. It may say:
Maximum file size: 2 MB
Accepted formats: JPG, PNG
Image must be under 5 MB
WebP not accepted
JPG recommended
If a portal only accepts JPG and PNG, do not convert to WebP unless the portal specifically allows it. If the portal allows JPG, a converted JPG version may be easier to upload.
Step 3: Decide Whether Transparency Matters
Transparency is one of the biggest reasons to keep PNG. If the image has a transparent background and you need that transparency, keep PNG.
If the background can be white or solid, converting may be fine. For many uploads, transparency is not required.
Step 4: Convert the PNG to a Better Format
Use ImageToSend’s Image Converter to convert the PNG into a format that fits the upload requirement. You might choose JPG for photos or WebP for modern web use when accepted.
The Image Converter is a public ImageToSend tool designed for converting images between compatible formats like JPG, PNG, and WebP. It is useful for format decisions, upload compatibility, and situations where PNG files are too large.
Step 5: Open the Converted Image Before Uploading
After converting, open the new file and check it visually.
Make sure:
The image still looks clear.
Text is readable.
Important details are not blurry.
The background looks correct.
The file format matches the upload rules.
The file size is closer to the limit you need.
Do not delete the original PNG immediately. Keep it until you confirm the converted version works for your upload.
Practical Examples
Example 1: Edited Screenshot
You take a screenshot, add arrows and text, then save it as PNG. The file becomes too large for a support form.
In this case, PNG may preserve the text and arrows clearly. But if the upload limit is strict, you can test a converted version and check whether the text remains readable.
Example 2: Edited Product Photo
You edit a product photo and save it as PNG. The image has no transparency, but the file becomes too large for an online listing.
A JPG version may be more practical because product photos are usually photographic. Converting the PNG can help prepare a smaller upload file.
Example 3: Transparent Logo
You edit a logo with a transparent background and the PNG becomes large.
In this case, you may need to keep PNG because JPG does not preserve transparency. If the platform accepts PNG and the file size is within the limit, PNG may still be the better choice.
Common Mistakes to Avoid
Saving Every Edited Image as PNG
PNG is not always the safest choice. It can keep quality high, but it may also create a file that is too large for everyday uploads.
Converting Transparent Images to JPG Without Checking
JPG does not keep transparency. If your PNG has a transparent background, converting to JPG may add a solid background.
Ignoring the Upload Instructions
Some platforms do not accept every format. Always check whether JPG, PNG, or WebP is allowed before converting.
Re-Editing the Same File Many Times
Repeated exporting can create confusion and multiple versions. Keep the original and create one clean upload version.
Only Looking at Image Quality, Not File Size
A file can look good but still be too heavy. Check both the visual result and the final file size.
Final Checklist Before Uploading
Before uploading a PNG that became too large after editing, check this list:
The image purpose is clear.
You know whether transparency is needed.
The upload platform accepts the chosen format.
The converted image still looks readable.
The file size fits the upload limit.
The image is not blurry after conversion.
You saved a clear final version.
You kept the original PNG until the upload works.
The file name is simple and easy to identify.
Conclusion
A PNG file can get too large after editing because PNG preserves detail, sharp edges, and transparency. That is useful for some images, but unnecessary for others. If the image is a regular photo or does not need transparency, converting it to JPG or WebP may make it easier to upload, send, or attach.
When a PNG file gets too large after editing, do not guess. Check the upload rules, decide whether transparency matters, and convert only when the new format fits the purpose. ImageToSend’s Image Converter can help you prepare a more compatible version without making the process complicated.
FAQ
Why did my PNG file become larger after editing?
A PNG can become larger after editing because it may preserve sharp details, transparency, added text, graphic elements, or extra visual information from the editor.
Should I convert a large PNG to JPG?
Convert to JPG when the image is mainly a photo and does not need transparency. Always check the result before uploading.
Is WebP better than PNG for smaller file size?
WebP can be smaller for many web uses, but not every portal accepts it. Check the upload requirements first.
Should I keep the original PNG?
Yes. Keep the original PNG until you confirm that the converted version looks good and uploads correctly.
Need to make a large PNG easier to upload? Use Image Converter at https://imagetosend.com to prepare a more compatible image format.
ImageToSend
Practical tools and guides to compress PDFs, resize images, and prepare ID and passport photos for online uploads.
Contact
© 2026 ImageToSend. All rights reserved.
Quick Links