Resize Student Photo for School Portal
Need to resize student photo for school portal? Learn how to adjust pixels, keep the face clear, and prepare an upload-ready image file for a school portal.
RESIZE IMAGES
6/23/20264 min read
You may have a clear student photo on your phone, but the school portal still refuses it, crops it badly, or shows it blurry after upload. This usually happens because the image is too large, too wide, too tall, or saved with dimensions that do not match the portal’s requirements.
Learning how to resize student photo for school portal uploads can help you prepare a cleaner image before submitting it. The goal is not to change how the student looks. The goal is to adjust the image size, dimensions, and framing so the photo displays properly in the school system.
School portals may use student photos for profile pages, ID records, class lists, exam registration, parent accounts, or learning platforms. A poorly prepared image can appear stretched, cropped, sideways, or too heavy to upload. Preparing it first can reduce common problems and make the submission easier.
Why School Portals Reject or Distort Student Photos
A school portal may not explain the problem clearly. It may simply say the upload failed, or it may accept the photo but display it incorrectly.
Common reasons include:
The photo file is too large
The image dimensions are too high
The photo is too wide or too tall
The student’s face is too close to the edge
The image is in the wrong orientation
The portal automatically crops the center
The photo was taken in portrait mode but uploaded into a square frame
Many school systems use fixed image boxes. For example, a portal may expect a square photo, a small profile image, or a maximum pixel width. If your original phone photo is very large, the system may compress or crop it automatically. That automatic processing can make the final result look worse.
How to Resize Student Photo for School Portal Uploads
Before resizing, check the instructions on the school portal. Look for details such as:
Maximum file size
Required width and height
Accepted image format
Recommended photo shape
Face visibility rules
Background requirements
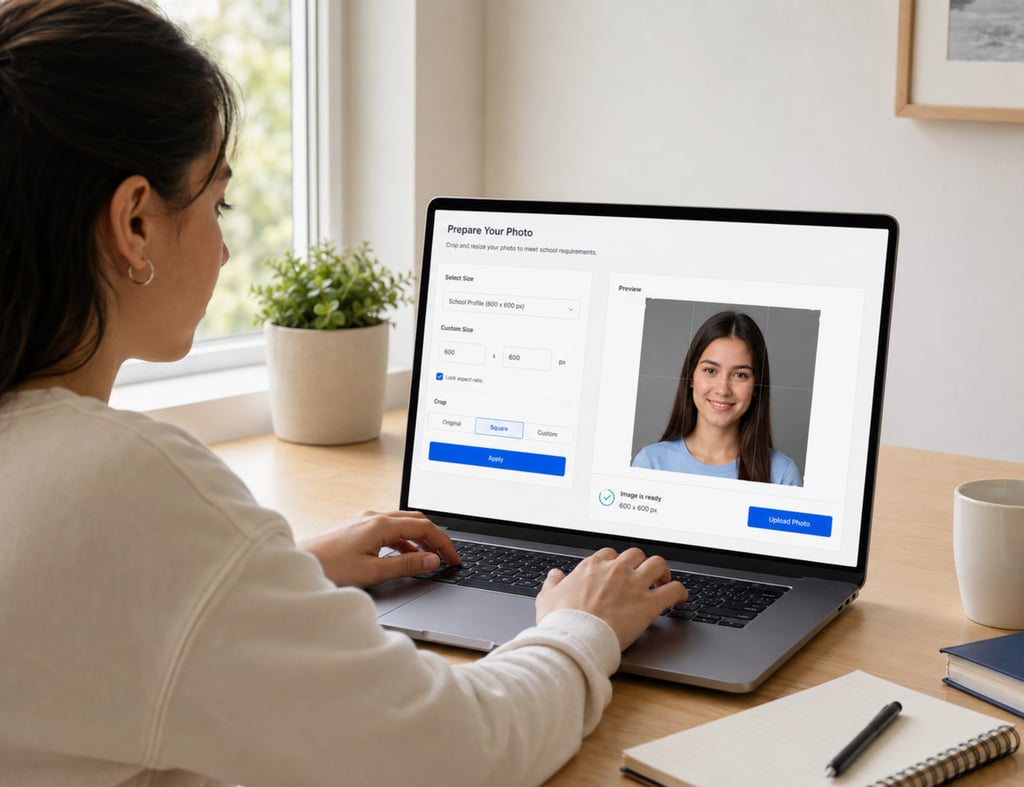
Some portals give exact dimensions, such as 600 x 600 pixels. Others only mention a maximum file size, such as 1MB or 2MB. If no details are shown, a clean square image with the student’s face centered is often easier for profile-style uploads.
Step 1: Choose the Clearest Original Photo
Start with the best original photo available. Do not begin with a screenshot or a photo that has already been shared many times through messaging apps. Those versions may already be compressed.
A good student photo should have:
Clear lighting
A sharp face
No heavy shadows
A simple background
The student looking toward the camera
Enough space around the head and shoulders
Avoid photos where the face is tiny, cropped at the top, or tilted. Resizing cannot fully fix a blurry or poorly framed original.
Step 2: Check the Current Image Size
Phone photos can be very large. A single image may be several megabytes and thousands of pixels wide. That is useful for printing, but it may be too large for a school portal.
Before uploading, check:
File size, such as 4MB or 8MB
Pixel dimensions, such as 3024 x 4032
Orientation, such as portrait or landscape
If the school portal only needs a small profile photo, you usually do not need the full original size. Resizing the image can make the file lighter while keeping the face clear.
Step 3: Resize Without Stretching the Face
The most important rule is simple: do not stretch the photo.
Stretching happens when you force the image into a new width and height without keeping its natural proportions. This can make the student’s face look wider, thinner, or distorted.
Instead, use proportional resizing. This keeps the image shape balanced while reducing the size. If the portal needs a square photo, crop first or use a square frame carefully, then resize.
For example:
If the portal wants a profile image, use a square crop with the face centered
If the portal wants a maximum width, resize by width and keep the aspect ratio
If the portal wants a smaller file, reduce dimensions gradually instead of making the image tiny
The Smart Image Resizer on ImageToSend is designed for this kind of task. It helps you resize images by dimensions and prepare files for upload limits without needing a complex editing program.
Step 4: Keep the Face Centered
School portals often crop profile photos automatically. If the student’s face is too high, too low, or too close to one side, the uploaded version may cut off part of the head or shoulders.
Before resizing, make sure:
The face is centered
There is space above the head
The shoulders are visible if needed
The background is not distracting
No important detail is near the edge
A little extra space around the student is useful because some portals apply their own circular or square crop after upload.
Step 5: Reduce File Size Carefully
If the portal gives a file-size limit, resizing the image dimensions can help reduce the file weight. For example, a large phone photo may become much smaller after resizing from thousands of pixels wide to a school-friendly size.
Do not reduce the image too far. If the photo becomes too small, the face may look pixelated or blurry.
A practical approach is:
Resize the image to match the portal’s recommended dimensions.
Save the new version.
Open it and zoom in slightly.
Check whether the face still looks clear.
Upload only when the file meets the portal rules.
This helps balance smaller file size with readable image quality.
Step 6: Save a Clean Upload Copy
Keep your original photo unchanged. Save the resized version as a separate file with a simple name.
Good file names include:
student-photo.jpg
school-profile-photo.jpg
student-portal-photo.jpg
Avoid special characters, long names, or confusing labels. A clean file name can help prevent small upload issues on strict portals.
Common Mistakes to Avoid
When preparing a student photo, avoid these common mistakes:
Uploading the full-size phone photo without resizing
Cropping too close to the face
Stretching the photo into a square
Using a blurry screenshot instead of the original image
Saving many edited copies until the quality becomes poor
Ignoring the portal’s required dimensions
Uploading a sideways photo
These mistakes are easy to miss, especially when using a phone. Checking the image before upload can save time.
Final Checklist Before Uploading
Use this quick checklist before submitting the photo:
The student’s face is clear
The photo is not stretched
The image matches the required dimensions
The file size is within the portal limit
The face is centered
The photo is upright
The file name is simple
The resized copy opens correctly
If everything looks correct, the file is better prepared for the school portal.
Conclusion
A student photo may look fine on your phone but still fail or display badly in a school portal. The issue is usually not the photo itself. It is often the file size, pixel dimensions, shape, or framing.
When you resize student photo for school portal uploads carefully, you can keep the face clear, avoid stretching, and prepare a cleaner file for submission. Use the Smart Image Resizer at ImageToSend to adjust the photo size and prepare an upload-ready image before sending it to the school system.
ImageToSend
Practical tools and guides to compress PDFs, resize images, and prepare ID and passport photos for online uploads.
Contact
© 2026 ImageToSend. All rights reserved.
Quick Links